WES51 Weller Soldering Iron - Review

The WES51 is excellent soldering iron that is designed and manufactured by famous Weller company. It is perfect for all kinds of soldering projects including repairs, rework, industrial manufacturing, etc. Its economical price makes it also a good soldering iron for occasional users such as hobbyist or home electronics enthusiast. The WES51 is best-selling soldering iron on Amazon.

Soldering Stand

And Weller has been around for many generations. Weller has started designing and manufacturing soldering irons in 1940s. Even though Cooper Tools acquired Weller Soldering in 1970s, the Weller brand name is well-respected and recognized throughout the world as a best manufacturer of soldering equipment.
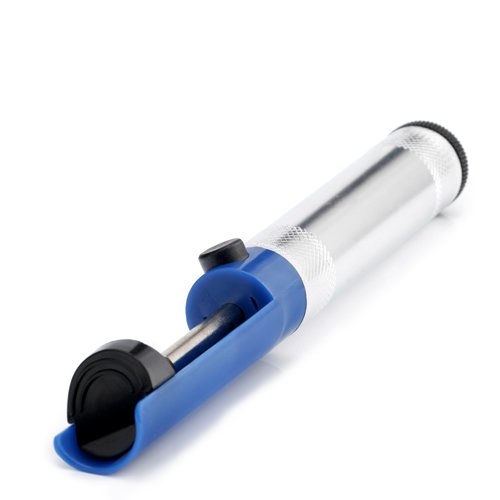
Soldering Stand

When you buy the WES51 Weller soldering station, you will receive the main power unit, the pencil, the pencil stand and a sponge attached to the pencil stand that you can use to clean the tip of the soldering iron. All of those tools combined into the soldering station setup, provide you everything that you need to start your soldering project.

Some of features of WES51 Weller station:
50 watt iron is is perfect for most soldering tasks Temperature range at the tip of iron is adjustable from 350 to 850 degrees Fahrenheit Non-burnable cord made of silicon rubber (cord length 4 ft.) Temperature lockout control so you do not burn up your circuit board with a careless mistake Easily switch between Fahrenheit and Celsius readouts Electronic temperature control is accurate to within 9 degrees Fahrenheit Station automatically powers down after 99 minutes of inactivity Static proof so you do not destroy delicate circuit boards Fast heat up of iron from cold to hot, even with bigger tips

The WES51 comes with PES51 soldering pencil that has a comfortable foam grip that improves the ease of use and reduces heat transfer from the iron into your fingers. I found the soldering pencil to be really quite comfortable to grip for extended periods. It features a stainless steel heating element which extends the soldering iron's life by minimizing corrosion. Soldering pencil PES51 uses ET series tips - Weller has a huge range of tips in ET series to suit all kinds of soldering jobs.

Main problem with most of soldering irons is that you need to wait for them to heat up from cold stage to ready-for-soldering stage, not only when you start using them, but also in between jobs if you leave them alone for a long period of time. For example, one of my soldering stations automatically powers down after 15 minutes of inactivity. Unfortunately, this particular setting is not adjustable so you can not customize it for your needs. In other words, you can not increase this time if you do little bit of soldering with a long periods of time between two soldering jobs. WES51 has a built-in activator that allows it to automatically powers down after 99 minutes of inactivity. That is right setting of this shut down time - you have enough time even if you have some longer interval between two soldering jobs.

Another great characteristic of the WES51 Weller soldering iron is that it has very accurate electronic temperature control. Temperature of iron can be adjusted with the front panel temperature control knob - you can precisely control the temperature of iron to within 9 degrees Fahrenheit. Electronic temperature control means you'll always know if the tip of the iron is hot enough for the material you are soldering. It makes your soldering task a whole lot easier. In addition, electronic temperature control allows precise control of the heat level at the tip of the iron. This means that you can rest assured that your iron is hot enough and ready for soldering, and at same time you know that it is not too hot to burn some temperature-sensitive components on circuit board. If you do not pay attention on temperature of iron's tip you can accidentally damage or ruin your soldering project by applying too much heat. For every soldering task you need enough heat to quickly and reliably melt the solder and apply it to soldering joints, but you do not want too much heat that can burn or melt delicate electronic components or circuit boards.

In conclusion, WES51 Weller soldering iron is solidly built, it has a very durable design and you can count on using one for many years with no problems. It comes in well known Weller-blue color. It is very comfortable to use this Weller soldering iron, even if you spend several hours of continuous soldering on your soldering task.

Weller WES51 analog soldering iron is very similar to Weller WESD51 soldering iron but does not have a digital display (digital display shows current temperature of iron's tip during operation or set-up).

Weller soldering iron WES51 is an excellent low cost soldering iron. It is one of the best soldering irons on market that can be found under 0. I give 4 out of 5 stars for this soldering station, as it lacks a digital readout.

WES51 Weller Soldering Iron - Review
Soldering Stand

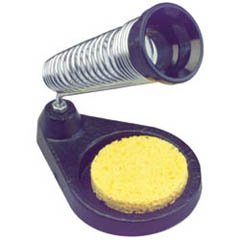
Special Price!!! Aven 17531 Soldering Iron Stand With Built In Sponge Tray

Aven 17531 Soldering Iron Stand With Built In Sponge Tray
Click for larger image and other views

Aven 17531 Soldering Iron Stand With Built In Sponge Tray

>> Click here to update Cheapest prices for Aven 17531 Soldering Iron Stand With Built In Sponge Tray <<

Aven 17531 Soldering Iron Stand With Built In Sponge Tray Feature

  • Holds up to 1-1/8" diameter iron
  • Two position stand
  • Heavy duty metal base
  • Sponge receptacle


Aven 17531 Soldering Iron Stand With Built In Sponge Tray Overview

Soldering iron stand. Holds up to 1-1/8" diameter iron in two positions. Heavy duty metal base has a built in sponge tray. Two per pack.


SAVE NOW on the special offers below!

Available In Stock.

This Aven 17531 Soldering Iron Stand With Built In Sponge Tray ships for FREE with Super Saver Shipping.

Price : Click to Check Update Prices Please.

Aven 17531 Soldering Iron Stand With Built In Sponge Tray

Limited Offer Today!! Aven 17531 Soldering Iron Stand With Built In Sponge Tray Black Friday and Cyber Monday Deals

Projector 720P Av Receiver 5.1 Yardman Lawn Mower

Top 11 Stained Glass Soldering Tips - Learn How to Solder Glass Art

We have boiled down our top 11 stained glass soldering tips to help you master the art and learn how to solder glass art.

Soldering Stand

This is one of the most crucial steps in the process and can truly make a difference in your stained glass projects.

Soldering Stand

So why do we use solder? Solder is a combination of tin and lead used to create a strong bond between other metals. Solder doesn't stick to the glass pieces, so we apply copper foil tape to the edges, which is where you get the copper foil method. We melt the solder over the copper foil that holds the pieces together.

These tips are going to cover the copper foil method, but you will also utilize solder with the lead came method as well.

1. Safety: One of the most important aspect of soldering any stained glass project is to take the proper measures to safeguard your health. Soldering involves working with potentially hazardous materials like lead, flux and harmful fumes. By observing specific safety precautions and using informed common sense, working in stained glass can be a safe and enjoyable past time. Ventilation, wearing glasses, and securing the glass pieces are a few additional tips.

2. Choosing your soldering iron: There is a lot to consider when you choose an iron for stained glass. The handle should be heat resistant and comfortable for you to hold. You may be holding it for several hours at a time, so consider the weight and balance of the iron. Wattage is an important aspect of the iron you choose. It must be able to continuously generate enough heat to melt all of the types of solder you plan to work with. We recommend an iron that is at least 60 watts with a way to control the temperature.

3. Iron and tips maintenance: Investing in a soldering iron is a big step in whether you take this art seriously or not. A well maintained soldering iron and tips perform better and make the job of soldering much easier. Consider buying a soldering iron stand to keep your iron working at its best.

4. Do I need flux? Flux is a chemical compound that is used to promote the bonding of metals by removing the oxide residue simultaneously with the soldering process. Because of oxidation and other matters, it's important to use flux in the bonding process as each mix of metals being used has a specific flux.

5. Before you begin: Make sure the foil is seated properly over the glass, trim all overlaps, put together all tools needed for the project, and secure your glass pieces. Not to mention review the safety measures.

6. Make sure you clean the surface you are about to solder. Steel wool is the best way to clean the surface of copper foil

7. Getting started: Flux all intersections first, then use a small amount of solder and flatten with the iron tip. Next fill in the gaps between the glass pieces until the solder is level with the surface of the glass. Then, coat the surface with a thin layer of solder. Finally, use your flux. We like to start at the top and work down as it tends to turn out better.

8. Running the solder bead: The best way we have found to run the bead is to hold the iron like a cutting knife and utilize your writing hand. If you run into a problem, just let the solder cool, then re-solder the joint applying more solder.

9. Fixing imperfections: If you apply too little add more. If you apply too much, then clean your iron tip and move the flat part across the seam. This will pull the excess solder easily. The key when soldering is to work slowly, but not too slowly causing heat fractures and melted solder.

10. Finishing: We use a finishing wax to make sure the solder is looking its best. Carnuba wax is one example that will work.

11. Practice: Utilizing stained glass soldering ebooks, courses, and videos and try different techniques. What works for one artist may not work as well for another. Find what fits your style.

Artist, this is just a start, but these are our top stained glass soldering tips. Yes, these get more in depth, but provide an overlay to the process and steps.

Top 11 Stained Glass Soldering Tips - Learn How to Solder Glass Art
Soldering Stand

Special Price!!! Solder Sucker

Solder Sucker
Click for larger image and other views

Solder Sucker

>> Click here to update Cheapest prices for Solder Sucker <<

Solder Sucker Feature

  • Simple design allows easy one-handed use


Solder Sucker Overview

Fast action, heavy duty desoldering pump. Simply heat up solder joint and push button. Automatic nozzle cleaner. Display packaged. Standard replacement tip #370-031. Length: 8".


SAVE NOW on the special offers below!

Available In Stock.

This Solder Sucker ships for FREE with Super Saver Shipping.

Price : Click to Check Update Prices Please.

Solder Sucker

Limited Offer Today!! Solder Sucker Black Friday and Cyber Monday Deals

Table Saw Table

Basic Jewelry Making Technique - How to Bezel Set a Gemstone

There is a pleasure that comes when you achieve a basic jewelry making technique. This is also the case when setting a beautiful stone on to a well design jewelry piece. A well designed setting must achieve several goals - it must secure and protect the stone, enhance the jewelry design, and it should be in harmony with the aesthetics of the piece.

Soldering Stand

The basic jewelry making technique you use when you set a cabochon stone is fairly easy to learn when you follow specific steps. This is the simplest of the basic settings. The stone sits on the base plate and is held by the perpendicular wall that surrounds the stone. This wall is pressed over the stone so that it leans against it, in this way securing it to the piece.

Soldering Stand

Bezels are most commonly used for cabochons, a gem shape that has a flat bottom. Because light does not usually enter a bezel set stone from behind, the setting is most commonly used for opaque stones.

Step by Step Instructions to Set a Cabochon Stone

• Begin by measuring the fine silver bezel (I order mine from Rio Grande Jewelry Supply) around your stone and allow a small overlap. Mark the bezel with a scribe or a sharpie marker and cut. Make sure that both ends are cut perfectly straight. This will make soldering the ends easier.

• Line up both ends of the bezel and make sure that they are flat by lightly pressing with your flat nose pliers.

• Set the lower part of the bezel into a loose soldering compound. I prefer to use odorless kitty litter. Flux the seam and place a small pallion of hard solder on top of the join. Using a bushy flame heat the bezel until the solder melts and seals the seam. You have to control the flame carefully to ensure that you do not melt the fine silver bezel.

• Remove the heat, quench the bezel in water and then soak it in the pickle. After about five minutes in the pickle solution take it out, rinse it in water and dry. Test the fit of your bezel by pushing the cabochon through the bezel from either side; the fit should be very snug.

• The Bezel is to too large? Don't worry you can cut the seam (removing the old solder), measure it again by wrapping it around the cabochon and re-solder. If the bezel is too small, stretch the bezel wire on a mandrel, or start over.

• Once you are satisfied with the fit of the bezel, fit it around the cabochon and carefully transfer it to the back plate. Make sure that you do not change the shape of the bezel. Place you piece on a tripod with a heat screen.

• Cut small medium solder pallions on a fire brick and melt them until they become small balls.

• Flux the back plate making sure that you bring the flux to the edge of the bezel. Place the tiny balls ¼ inch apart around the perimeter of the bezel. Heat from below until the solder melts and the seam is filled. Pickle the piece, rinse in clean water and dry.

• To ensure that cabochon fits into the bezel, use a piece of thread or dental floss behind it to test the fit.

• When a cabochon is smaller than the bezel use the floss to pop the stone. Reduce the height of the bezel by sanding it face down on a piece of 200 sand paper.

• Once the soldering is completed, polish the area around the bezel with a small felt wheel and Tripoli compound. Complete the polishing process by using rouge. Make sure not to allow the bezel to get caught on the wheel.

• Place the cabochon in the bezel. Using a burnisher ( I prefer to use a hard wood burnisher) start pressing on the bezel using a rocker clock wise motion. Work around the stone, pushing the bezel down with opposing moves to keep the stone centered and to keep the bezel from getting pleated. Smooth the pushed bezel with the burnisher by rubbing around the outer edges with a consistent pressure.

• Many times I use a two part epoxy to secure the stone into the back plate before securing the bezel. This ensures that the stone will stay in place at all times.

• Be careful not to get polishing compounds on the stone as they can stain. Do not get soap and water under a transparent stone as it will discolor the metal.

The more you practice the more you will master the use of this basic jewelry making technique.

Basic Jewelry Making Technique - How to Bezel Set a Gemstone
Soldering Stand

Special Price!!! Heavy Duty Soldering Iron Stand

Heavy Duty Soldering Iron Stand
Click for larger image and other views

Heavy Duty Soldering Iron Stand

>> Click here to update Cheapest prices for Heavy Duty Soldering Iron Stand <<


Heavy Duty Soldering Iron Stand Overview

Heavy duty stand features a weighted iron base, large sponge tray, and metal iron holder. Built to withstand everyday industrial use. Net weight: 1/2 lbs.


SAVE NOW on the special offers below!

Available In Stock.

This Heavy Duty Soldering Iron Stand ships for FREE with Super Saver Shipping.

Price : Click to Check Update Prices Please.

Heavy Duty Soldering Iron Stand

Limited Offer Today!! Heavy Duty Soldering Iron Stand Black Friday and Cyber Monday Deals

Mystery & Thrillers Books Laptop Convertible Tablet Chicco Cortina Travel System Stroller

Weller Soldering Stand/Sponge For PES50 Soldering Pencil

Special Price!!! Weller Soldering Stand/Sponge For PES50 Soldering Pencil

Weller Soldering Stand/Sponge For PES50 Soldering Pencil
Click for larger image and other views

Weller Soldering Stand/Sponge For PES50 Soldering Pencil

>> Click here to update Cheapest prices for Weller Soldering Stand/Sponge For PES50 Soldering Pencil <<

Weller Soldering Stand/Sponge For PES50 Soldering Pencil Feature

  • Soldering tool stand with base, receptacle and sponge
  • For use with Weller soldering iron PES50


Weller Soldering Stand/Sponge For PES50 Soldering Pencil Overview

Features Soldering tool stand with base, receptacle and sponge For use with PES50 iron Sponge: TC205


SAVE NOW on the special offers below!

Available In Stock.

This Weller Soldering Stand/Sponge For PES50 Soldering Pencil ships for FREE with Super Saver Shipping.

Price : Click to Check Update Prices Please.

Weller Soldering Stand/Sponge For PES50 Soldering Pencil

Limited Offer Today!! Weller Soldering Stand/Sponge For PES50 Soldering Pencil Black Friday and Cyber Monday Deals

Sonos Radio

Tips to Repair Your Toyota Tacoma Temperature and Compass Display - Overhead Console

Toyota makes excellent, dependable vehicles despite what the mainstream media would have you believe. However, occasionally even the best designs have problems, and such is the case with the Tacoma overhead console. (Actually, the ambient temp and compass display is officially called the 'accessory meter' by Toyota.)

Soldering Stand

The display is designed to provide outside temperature readings, and also displays a digital compass heading. Unfortunately, the Mexican manufacturer of the part used both low quality solder and inadequate resistors, resulting in component separation from the circuit board. The result? A dead display.

Soldering Stand

You have a couple choices when this happens...if you are under warranty the dealership will repair it (actually, they replace it) for free...and word is that people are getting better quality units as compared to the originals. If you are no longer under the 3 year/ 36k warranty the news is pretty grim though...the new part and installation cost is well over 0! (There is absolutely no legitimate reason for this price...the hardware probably cost to make, and the installation is very simple.)

Anyway, on to the recommendations for the do it yourselfer:

Removing the clear plastic cover: -use a small flathead to carefully pry up each clip, bumping each one slightly over the edge until all are released. Don't try to pull the cover off until ALL four clips are released, otherwise they break. Soldering tips (get it?):

-Don't use a gun style iron w/ trigger. These are too powerful, bulky, and generally don't have a suitable tip. Get an inexpensive pencil style. I have a 0 digital station, but still use an el cheapo iron for day to day tasks.

-Stands are nice, and usually have built in sponges.

-Always keep the tip shiny with no hanging solder drops. Use tip cleaner and/or damp sponge to keep it that way...do this often.

-Don't use lead-free (RoHS) solder, use 60/40.

-Take lots of breaks, and look up frequently to focus your eyes on faraway objects. It is likely that you aren't used to working with small parts up close, and it can be frustrating. Take a break and come back later.

-If your hands are shaky, go drink a beer or two. It will help. Caffeine and sugar won't.

-Don't put solder on the iron to transfer to the work. The iron's purpose is the heat up the *part* so that solder will flow.

-Your work should be bright and shiny when done, like a little bit of the liquid metal bad guy from Terminator II is holding your resistors on the board.

-Be aware of your iron. Don't melt the plastic on your power button or cover clips. Don't drop solder onto the board in random places.

-Put some solder on the resistor pads before installing new components. You should then have 4 shiny little bumps. You can use these to 'tack' the lead wires to by heating up the pad/wire with your iron. Once one lead is tacked, fully solder the other end, then come back and finish the job.

General tips and recommendations:

-Use new components! Go to Radio Shack (assuming they carry actual electronic parts these days) and get a couple 51 ohm lead wire resistors. 47 ohm will work, too. They are in parallel, so you can lay the leads against each other and solder to the board.

-If you use your old original SMT resistors, they WILL fail again. The ends will have oxidized and solder won't stick well. Unfortunately cleaning/sanding won't work, the layer of metal is too thin. Remember, time is money...just do it right the first time.

Good luck with your repair!

Tips to Repair Your Toyota Tacoma Temperature and Compass Display - Overhead Console
Soldering Stand

Special Price!!! Helping Hand with Magnifying Glass

Helping Hand with Magnifying Glass
Click for larger image and other views

Helping Hand with Magnifying Glass

>> Click here to update Cheapest prices for Helping Hand with Magnifying Glass <<

Helping Hand with Magnifying Glass Feature

  • The Practical Helper for Soldering Work
  • Electronics and Model-Making
  • Adjustable Clamps and Arms- Can Be Adjusted In Many Ways
  • Strudy Base


Helping Hand with Magnifying Glass Overview

Helping Hand with Magnifying Glass. The Practical Helper for Soldering Work. Electronics and Model-Making. Adjustable Clamps and Arms- Can Be Adjusted In Many Ways. Strudy Base


SAVE NOW on the special offers below!

Available In Stock.

This Helping Hand with Magnifying Glass ships for FREE with Super Saver Shipping.

Price : Click to Check Update Prices Please.

Helping Hand with Magnifying Glass

Limited Offer Today!! Helping Hand with Magnifying Glass Black Friday and Cyber Monday Deals

Helping Hand with Magnifying Glass

Helping Hand with Magnifying Glass
Click for larger image and other views

Helping Hand with Magnifying Glass

>> Click here to update Cheapest prices for Helping Hand with Magnifying Glass <<

Helping Hand with Magnifying Glass Feature

  • The Practical Helper for Soldering Work
  • Electronics and Model-Making
  • Adjustable Clamps and Arms- Can Be Adjusted In Many Ways
  • Strudy Base


Helping Hand with Magnifying Glass Overview

Helping Hand with Magnifying Glass. The Practical Helper for Soldering Work. Electronics and Model-Making. Adjustable Clamps and Arms- Can Be Adjusted In Many Ways. Strudy Base


SAVE NOW on the special offers below!

Available In Stock.

This Helping Hand with Magnifying Glass ships for FREE with Super Saver Shipping.

Price : Click to Check Update Prices Please.

Helping Hand with Magnifying Glass

Limited Offer Today!! Helping Hand with Magnifying Glass Black Friday and Cyber Monday Deals

NEW SOLDERING IRON STAND HOLDER + SPONGE METAL GUN HOLD

NEW SOLDERING IRON STAND HOLDER + SPONGE METAL GUN HOLD
Click for larger image and other views

>> Click here to update Cheapest prices for NEW SOLDERING IRON STAND HOLDER + SPONGE METAL GUN HOLD <<


NEW SOLDERING IRON STAND HOLDER + SPONGE METAL GUN HOLD Overview

Metal stand with sponge that fits most standard soldering irons. For pencil type Irons. All metal construction. Easy to assemble. Sponge included.


SAVE NOW on the special offers below!

Available In Stock.

This NEW SOLDERING IRON STAND HOLDER + SPONGE METAL GUN HOLD ships for FREE with Super Saver Shipping.

Price : Click to Check Update Prices Please.

NEW SOLDERING IRON STAND HOLDER + SPONGE METAL GUN HOLD

Order Now NEW SOLDERING IRON STAND HOLDER + SPONGE METAL GUN HOLD Best Price at Amazon.com

Stained Glass Kits - 12 Essential Items For Making Leaded Glass Panels

Do you want to learn how to make stained glass but faced with a confusing array of stained glass tools and materials? Here's the top 12 essentials for a stained glass kit, with buying tips and brief user descriptions to help your stained glass career take off without a hitch. All are available at any good stained glass suppliers.

Soldering Stand

Cutting

Soldering Stand

1 Oil-filled cutter. There's lots of different types of cutter, but make sure you buy one that has a reservoir for oil. This automatically lubricates the tugsten carbide wheel as you make your scoreline, which saves you from constantly having to dip it in oil. Buy an oil-filled pistol grip cutter if you think you might have trouble applying pressure with a pen-shaped cutter.

2 Grozing Pliers. A tool specifically made for stained glass, the grozier is used for breaking difficult cuts and nibbling the edges of glass.

Leading

3 Lead knife. You'll need to cut those 6ft lengths of lead accurately, so buy a dedicated stained glass lead knife and keep it sharp.

4 All Nova Tool or Fid. Silly names, but it's actually one of the most useful - and cheap! - tools in your stained glass kit. Use it to open up the lead cames before leading, and to close them down after cementing.

5 Lead Vice. You could trap lead cames in your door before stretching it, but instead, keep your partner happy by investing in a lead vice. It grips one end of the lead whilst you tug on the other with pliers. Hold on tight!

6 Horse Shoe Nails. These have been stolen from blacksmiths - they use them to bang into horses hoofs, we use them for holding in place all those really annoying bits of lead that pop out all over the show when you're leading up.

Soldering

7 Tallow Candle. These are made of animal fat and are used as a flux for the solder. Rub a bit on to each lead join before you solder. Think roast beef!

8 100W Soldering Iron. Try to get a soldering iron with a thermostat, as it won't melt you're carefully cut lead. My students have tried both gas and 200W soldering irons over the years, but the general consensus is that the 100W is the easiest to handle, and powerful enough for any soldering job.

9 Grade C Solder. Made sure you buy solder that's 60% lead and 40% tin for leaded stained glass work. Try to work in a well ventilated area when soldering - along with everything else related to stained glass, it's dangerous!

Cementing and Polishing

10 Leaded Light Cement. Strictly speaking this isn't exactly an essential, as you can make this up a lot cheaper with standard putty, white spirit and black powder paint. But I don't want to put you off with that hideous messy job right at the beginning - so buy a pot of ready made cement for starters.

11 Whiting. Used for absorbing all the mess made by the cement. Just sprinkle it over your panel and brush it off. Use some muscle.

12 Black Grate Polish. Use a shoe brush to shine your leads to twinkly perfection. Stand back and admire.

I admit it, I cheated. Top marks if you've spotted the two vital missing items in this otherwise most comprehensive of stained glass kits - glass and lead! But that's the fun bit and for you to enjoy - gazing in wonder at all the different types of glass, the amazing array of textures and colours, and imagining the creative possibilities ahead...bliss!

Stained Glass Kits - 12 Essential Items For Making Leaded Glass Panels
Soldering Stand

Aven 17531 Soldering Iron Stand With Built In Sponge Tray
Click for larger image and other views

>> Click here to update Cheapest prices for Aven 17531 Soldering Iron Stand With Built In Sponge Tray <<

Aven 17531 Soldering Iron Stand With Built In Sponge Tray Feature

  • Holds up to 1-1/8" diameter iron
  • Two position stand
  • Heavy duty metal base
  • Sponge receptacle


Aven 17531 Soldering Iron Stand With Built In Sponge Tray Overview

Soldering iron stand. Holds up to 1-1/8" diameter iron in two positions. Heavy duty metal base has a built in sponge tray. Two per pack.


SAVE NOW on the special offers below!

Available In Stock.

This Aven 17531 Soldering Iron Stand With Built In Sponge Tray ships for FREE with Super Saver Shipping.

Price : Click to Check Update Prices Please.

Aven 17531 Soldering Iron Stand With Built In Sponge Tray

Order Now Aven 17531 Soldering Iron Stand With Built In Sponge Tray Best Price at Amazon.com

Soldering Station with Helping Hand, 2 1/2" Dia. Glass Lens

Soldering Station with Helping Hand, 2 1/2
Click for larger image and other views

>> Click here to update Cheapest prices for Soldering Station with Helping Hand, 2 1/2" Dia. Glass Lens <<

Soldering Station with Helping Hand, 2 1/2" Dia. Glass Lens Feature

  • 2½" Diameter
  • Glass Lens
  • Power 2X


Soldering Station with Helping Hand, 2 1/2" Dia. Glass Lens Overview

SE Soldering Station with Dual Helping Hands Station has chrome Solder Iron Holder Solder Iron Tip Cleaning Sponge and Water Resevoir Magnifying Glass 2½ in. Diameter Glass Lens Power 2X


SAVE NOW on the special offers below!

Available In Stock.

This Soldering Station with Helping Hand, 2 1/2" Dia. Glass Lens ships for FREE with Super Saver Shipping.

Price : Click to Check Update Prices Please.

Soldering Station with Helping Hand, 2 1/2

Order Now Soldering Station with Helping Hand, 2 1/2" Dia. Glass Lens Best Price at Amazon.com

Helping Hands with Magnifying Glass

Helping Hands with Magnifying Glass
Click for larger image and other views

Helping Hands with Magnifying Glass Feature

  • Great for soldering and working with small items
  • 2-1/2" glass lens magnifier
  • Heavy cast iron base
  • 2 alligator clips mounted on 4 way swivels


Helping Hands with Magnifying Glass Overview

Quality helping hands with solid heavy duty cast iron base, great for soldering and working with small items. Useful tool for electrician, engineers, jewelers and more. Helping hand comes with 2-1/2" glass lens mangifier and 2 alligator clips mounted on 4 way swivels.


Available In Stock.

This item ships for FREE with Super Saver Shipping.

Price : Click to Check Update Prices Please.

Helping Hands with Magnifying Glass

Order Now Best Price at Amazon.com

Soldering Iron Holder

Soldering Iron Holder
Click for larger image and other views

Soldering Iron Holder Feature

  • Holder w/ Sponge


Soldering Iron Holder Overview

Soldering Iron Holder


Available In Stock.

This item ships for FREE with Super Saver Shipping.

Price : Click to Check Update Prices Please.

Soldering Iron Holder

Order Now Best Price at Amazon.com